KIS-Cart2002 Setup
In the contents section, we reviewed
the page names, and the .htm counterpart to those names. You will need to know this,
as you have the option of customizing your page names to the names you have chosen
for your categories. Through the navigation view, we will be changing the names
of the categories pages, and the product detail pages. This is optional, but a good
idea.
Please visit
www.i3dthemes.com/frontpage_basics.
From here you can learn the basics of using FrontPage, and much more.
If you don't know this trick already,
a short cut key for undoing a step is to press (CTRL+Z) at the same time. This will
save you many headaches.
The other really helpful shortcut keys are (CTRL+C) for copying, and (CTRL+V) for
pasting.
Let's get started! Print this
page for easy reference
import all your product images
(including images for categories):
-
place all your product and category
images into the same folder on your hard drive.
-
Now open FrontPage if it is not already
open, ensure that the folder list window is open.
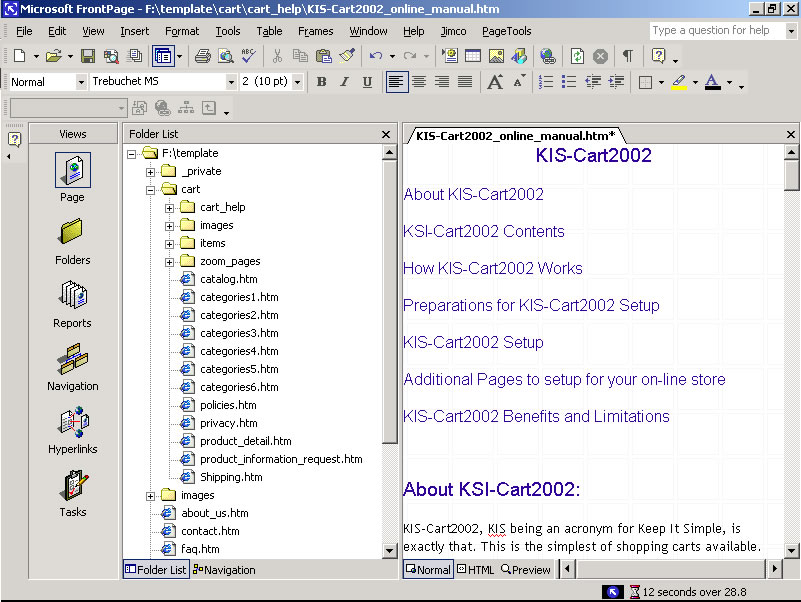
review this image for setup details.
-
Find the "images" folder located
in the "cart" folder, and select/highlight it
-
with this folder still selected, click
on the file menu, select > import > Add File >
browse to the folder where you stored
your product and category images. select the image files to import.
** TIP** Keep thing simple by importing
them into your images folder located in the "cart"
directory. Always separate your product images from your web site images. With the
images folder selected when you choose to import a file, the files will go directly
to that folder, if you do not have any folders selected, the imported files will
go to the root directory (with your index.htm page etc.) You can do one image at
a time, and to make things really easy, you can drag them from a folder on your
hard drive, directly into the images folder, in the cart folder. Or you can optionally
drag an image from a web page, directly into the cell you are working on, there
are many ways or adding image files to your web site. If you drag them from an outside
source into your web page, remember to change the default "save" location when you
save the page. Save the images to the "images"
folder in the "cart"
folder.
open catalog.htm
**TIP** (for
all our exercises, we are going assume that you have the images stored in your
images folder, located in your cart
folder, we will be dragging images from this folder onto your web page. Please ensure
that you have your Folder List
in view, and we will be working in Page View,
and Navigation view for
most of the time. If you are unsure at this point of the folders,
and or views that we have discussed, please
review this image for setup
details. To have your Folder
List in view, click on the View
menu, ensure you can see the "Folder
View" option, if not click on the two downward pointing
arrows at the bottom of the list, and click. Make sure the icon beside the "Folder
View" is selected, it doesn't have a check mark as
most selected items do, this one just looks depressed. (literally)
now let's update your catalog page:
-
replace the image in the first category
cell (categories1) with an image of your own.
-
The default image is already linked
to the categories1.htm page. To preserve the hyperlink you can do
the following:
-
select the default image with your
mouse (one single right click) to open the properties menu.
-
select "Picture Properties"
> select the General Tab > and click on the browse button
located next to the now highlighted "Picture Source" box.
-
Browse the your images folder
located in the cart folder, and select the image for your category 1.
-
Select this image, and click OK, all
the way out. You now have your image in the first cell label "categories1", with
the hyperlink to the categories1.htm still in tact.
-
Change the text from "categories1"
to the name of your category, and you are finished with this cell, You can repeat
these same actions for the next five categories.
Leave the "Featured Items" until
your product detail pages are complete. We'll get to this at the end of the
setup.
-
If you are finding this a but confusing
at this point, we suggest that you review some basic FrontPage tutorials, and
become familiar with this program before moving on. We have tutorials on our web
site to help you with the basics of FrontPage, and many advanced help topics as
well.
-
Please visit
www.i3dthemes.com/frontpage_basics.
From here you can learn the basics of using FrontPage, and much more.
-
If you haven't already, please sign
up with PayPal and review the setting up a shopping cart button. More helpful
PayPal info below:
-
add an image to a web page
-
change a hyperlink
-
copy and paste text
-
add a web component (HTML component
located in the Insert menu > web components > advanced controls > HTML)
-
change a page name (Title) while in
navigation view
-
work in navigation view, folder view,
page view, and HTML view
**We will look at adding more category
pages, and adding more items to the category pages at the end of the set up information.**
Lets update your category pages
-
we will be changing the names of your
categories1...categories6 pages to the names you have chosen for your categories.
-
switch to navigation view, and locate
your categories pages.
-
click on the page named Categories1,
click the box twice / slowly, until the "Categories1" text is highlighted.
-
if you click on this box to quickly,
you will open that page, try again, or use a right mouse click, and select "rename".
-
type a new name for this page, while
this box is still highlighted, press the tab key
-
this will move the focus to the next
page "Categories2" it will already be highlighted, now type in your new text for
this page.
-
repeat this process for the rest of
the Category pages
-
you have now changed the Titles of
your pages. This will show is your visitors browser status bar.
-
switch to folder view
-
open the "cart" folder
-
locate the file named categories1.htm
(the title for this page should now read as your newly chosen category name)
-
rename the categories1.htm page to
match the title (ex: your category page title is "Mice" rename your categories1.htm
page to "mice.htm")
**TIP**Type the name as " your_category_name.htm"
if you have more than one word for your category. Make sure you put an underscore
joining your words "_". This is the key located next to the "0 zero"
key. Press shift and underscore at the same time. If you do not use and underscore
to join your words when naming an HTM document, your visitors will see an ugly and
unprofessional "20%" between each word in the address bar. (example: http://www.your%20web%20site.com)
**TIP** this is the
only page in your cart which you should, and can rename. Changing the names
(the .htm name) of the product detail pages, and the zoom pages will affect the
JavaScript pop-up windows.
-
switch to page view
-
select and open your first category
page (what was categories1)
-
you will see that the banner at the
top of the page has changed to reflect the new name you have chosen for this page.
-
lets update the first row, starting
with your product image
-
images column: swap the images
in the image column
-
name column: change the names
in the name column from it** to the name of your product
**DO NOT change the
zoom view hyperlink, this text is created through JavaScript, and not regular
HTML text, and hyperlinks
**do not edit the
information beneath the "zoom view" links. The hyperlinks named "it1 zoom
image...it48zoom image" are merely placeholders. Once you have updated your zoom
pages later in the setup, you can delete these links if you with to (and we suggest
you do)
-
product description column:
enter your product description, keep it short.
-
price column: change the price
of the product in the price column
**DO NOT change the
"more info" text under the product info column, this is created from the JavaScript
component
-
Cart
column: log into your
PayPal account. click on the sell tab
-
select the shopping cart option
located in the Sell on a Web site menu box
-
fill in the information to create your
shopping cart button. It is important to select the shopping cart option and not
the single item option because you want your visitors to have access to view their
cart, so they can make multiple purchases.
-
you have the option of using the "add
to cart" buttons and the "view cart" buttons that are provided with the web theme/template,
or you can use the standard PayPal buttons. If you wish to use the image buttons
provided with the theme, you will first need to upload them to your server, and
then you would enter this information as in the example below: The name of the
image you will be using for your themes add to cart button is "add2cart.gif"
Select an Add to Cart button (optional)
|
 |
|
|
-
-
replace "your_web_site" with
the name of, you got it!, your web site.
-
click on the "add more features"
button
-
fill in the information for shipping
and sales tax preferences
-
change the "view cart" button information
as you did with your add to cart button ( if you will be using the theme "view
button" button)
-
the name of the image that you will
be using for your themes "view cart" button is "viewcart.gif"
-
make sure that you have uploaded, or
published your images folder to your server, if you want to use the theme images
for add to cart and view buttons
-
complete any information for personalizing
your visitors experience
-
click on the "Create Button Now"
button
-
when the next page loads, highlight
and copy the HTML code for the "add to cart" button, from the text
box; (highlight and press CTRL+C)
-
switch back to FrontPage, and in the
first row, under the cart column, select the PayPal image with a single
click of the mouse
-
while this image is still selected,
click on the Insert menu > web component > advanced
controls > HTML
-
when the HTML component window opens,
paste the HTML code you just copied (CTRL+V)
**the PayPal image
will disappear, and be replaced by a small yellow rectangle, this is the symbol
(anchor) for a web component
**alternately, you can delete the default PayPal button, then switch to HTML view
and paste the code directly into your HTML window (if you do this method, which
is the easiest, just switch to HTML view, and press (CTRL+V) right away, and switch
back to normal view. You will see the button, immediately. If for some reason this
didn't work, press your (CTRL+Z) keys while you are in page view, to undo this step,
and try again. Sometimes if you hold your (CTRL+key) for too long, the action you
are trying to perform, will be repeated several times, so be quick.
You can "cheat" ,
delete the rest of the default PayPal buttons in the column, copy the first "add
to cart" button you just made, and paste it into the rest of the empty cells. By
adjusting three pieces of the HTML code for the "add to cart" button, you can change
the product "Name" "Product
item number" and 'Product
Price". This is the only information
that changes for each new button that you would create using the PayPal web site.
Click on the second
row's PayPal button
(this will only work if you added the button with the HTML view and not as a web
component) with this image selected, switch to HTML view, you will see the highlighted
information below (or something similar. You only need to change three bits of code
to change the item Name
, Product item number,
and price for this shopping
cart button. The highlighted code is the code for the button image, the line directly
above the highlighted code is the line that you will be working on. There is a second
example below.
<p align="left"><a href="#" onclick="window.open('https://www.paypal.com/cart/add=1&business=i3d%40shaw.ca&item_name=product
name&item_number=productnumber&amount=15.99','cartwin','width=600,height=400,scrollbars,location,resizable,status');">
<img src="http://images.paypal.com/images/sc-but-01.gif" border="0" width="70" height="35">
-
by copying the first button that you
added from PayPal (the one with all you account information, not the default button)
and pasting it into the cells below, you can change the following info, instead
of having to go back to PayPal and re-create the HTML code for each button
-
look at the example below, you will
be working on the line that is directly above the highlighted line of code.
-
as in the example below, the first
word or words you will be changing is the product name
-
find the name for the product,
-
as in the example below, the code that
immediately precedes your product name is "&item_name=product_name"
-
(this will be the name that you gave
your product when you made the add to cart button on the PayPal web site)
-
once you have found the name of the
product, highlight it, and rename it to what ever your next product will be
-
the easiest way to do this is to click
on the product name twice, and then type the new name
-
next, change the product item number
"&item_number=product_item_number"
-
the last bit of info to change is the
price, "&amount=15.99" (you do
not need the "$$" sign)
-
Your done, by copying the first button
and pasting it into the cells for the rest of your products, you can easily alter
the HTML code to suit each product, instead of having to re-create a new button
via the PayPal web site.
-
onclick="window.open('https://www.paypal.com/cart/add=1&business=i3d%40shaw.
ca&item_name=product_name&item_number=product_item_number&amount=15.99','
cartwin','width=600,height=400,scrollbars,location,resizable,status');">
if you have trouble
with this method, stick with creating you buttons through the PayPal web site, you
are given the option to create more buttons when your first button is finished
-
View Cart button: copy the HTML
code for the "View Cart" button, and repeat the same steps as for the "Add to
Cart" button.
-
delete the "default" view cart image
on your category1 page
-
place your cursor on the spot that
you want to place the new button
-
switch to HTML view, and paste
(CTRL+V) , and do this quickly so you don't paste multiple copies of the code
-
switch back to Normal view,
and you should see your new button, if it's didn't work, press (CTRL+Z) to undo
your actions, and try again
-
you can add the new "view cart" button
using the insert web component menu as well
-
you have several options for changing
the view cart button on each of the category pages, and product detail pages,
The simplest method is to copy the button that you made on the PayPal web site,
and paste it over the default 'view cart" buttons on each subsequent page. This
is simple, and leaves little room for error, but it is a bit more tedious than
the second method
-
the second method is to replace the
"default" buttons HTML code, with your own, by using the find and replace feature
in FrontPage. This will update all your buttons at the same time, and we will
also show you how this feature so you can save you huge amounts of time on future
projects.
now we are going to update the "view
cart" button throughout the whole site. Each category page, and product detail page
has a view cart button, you will need to update this button on each of these pages.
But don't fear, we are going to update all your buttons in less than 2 minutes
**TIP** the find and replace feature
of FrontPage will save you hours of work, by quickly and easily replacing old text,
with updated text. We are going to replace the "default" view cart hyperlink with
your own "view cart" hyperlink.
<a href="#" onclick="window.open('https://www.paypal.com/cart/display=1&business=i3d%40shaw.ca','cartwin','width=600,height=400,scrollbars,location,resizable,status');">
|
|
<img src="https://www.paypal.com/images/view_cart.gif"
border="0" width="130" height="32" align="right"></a></td> |
-
the line of code directly above the
highlighted line of text is the information that you need to change for each default
"view cart" button
-
follow these steps to change all of
the "view cart" button links (please make sure that the view cart button on your
categories1 page has been updated with the code from the PayPal web site)
-
starting from the beginning, you will
need to have two pages open for this exercise
-
close all open web pages
-
open categories2.htm, and
categories1.htm, (or whatever they are renamed to)
-
switch to the page view on
categories2.htm, and click on the "view cart" button
it is important that
you select a "view cart"
button that has not been updated, we want to find out what the "default"
code for each button is, so we can change it to the code for your PayPal shopping
cart
-
with the view cart button selected,
switch to HTML view
-
the line of HTML code directly above
the highlighted text is what you will be copying, so highlight that entire line
of code. The example below is very similar to what you will be copying
-
highlight the entire line of code,
including the opening and closing brackets < >
| <a href="#" onclick="window.open('https://www.paypal.com/cart/display=1&business=i3d%40shaw.ca','cartwin','width=600,height=400,scrollbars,location,resizable,status');"> |
-
on the Edit menu, select "Find"
or press (CTRL+H for find and replace)
-
make sure the tab for "Replace"
is selected
-
you will see the text that you highlighted
is already added to the "Find What" box
-
while the Find and Replace window
is open, click on the "categories1.htm" page to view it
-
you will notice the the "Find and
Replace" window is still in view, great
-
on the categories1 page, click
on the "view cart" button (single click)
-
be sure this is the same button that
you added from the PayPal web site.
-
switch to HTML view
-
copy the code directly above the highlighted
HTML code (to copy press CTRL+C)
-
copy the entire line of code, including
the opening and closing brackets < >
-
paste this code (CTRL+V) into the "Find
and Replace" window, under the second text box named "Replace with"
-
make sure the following options are
selected "All Pages" and "Find in HTML"
-
click on the "Replace All" button
-
select yes when you are warned
about changing the text in each page, and not being able to undo it
-
you will see the pages being changed,
with a total being displayed
-
click on the "X" at the top
right corner to close the window
-
you have now changed the links for
all you "view cart" buttons.
Example code
<a href="#" onclick="window.open('https://www.paypal.com/cart/display=1&business=i3d%40shaw.ca','cartwin','width=600,height=400,scrollbars,location,resizable,status');">
|
|
<img src="https://www.paypal.com/images/view_cart.gif"
border="0" width="130" height="32" align="right"></a></td> |
The tough part is over.
Learning how to manipulate your HTML
code will be a valuable asset for future web site development.
UPdate the information for the rest of
your products on your category page, and take a break :)
-
first thing we are going to do is to
update the product detail page's "title"
-
switch to navigation view
-
expand the pages under the "categories1"
page (or what ever you have changed the name of categories1 to)
-
as we did with the categories pages,
rename the pages below categories1 from "it1....it8" to the actual
name of your product
-
try to keep the name short, so it won't
wrap the text inside the cells on the categories page
-
you can rename all of your "it"
pages now, or just complete a few at a time
-
switch to Folders view, expand
the cart > items folder, to view the changes
-
you should see the pages under the
"name" column listed as "it1.htm....it48.htm"
-
you will notice that the names in under
Titles column have changed
-
now it's time to change the actual
" .htm " name for your pages. This is optional, but it does put a polished
look on your web site.
-
to change the name of your .htm
file to match the name of your page Title, right click on the page "it1.htm"
-
select rename
-
rename this page to match the
page title, don't forget to add the extension ".htm"
(for example, if your first product in
your categories1 page is a product called "Scroll Mouse", then you
probably changed the title of the product detail page (it1..it48) to Scroll
Mouse when you were updating the titles in navigation view. So change the name
for this page from it's default of "it1.htm" to "scroll_mouse.htm".
Remember to place an underscore between each word when naming an ".htm" page.
-
while the text is still highlighted,
press the "down" arrow on your keyboard
-
after a brief update, choose "yes"
to update your links when asked
-
now the next page in this folder
will be highlighted for editing
-
edit the name for this page
-
repeat the process all the way down
-
If you changed all the titles of your
pages while you were in navigation view, you can see how quickly and easily you
can change a long list of page names in no time at all.
One reason we want to change the page
names and titles from their default, (although optional) is because each product
detail page (it1.htm...it48.htm) displays a page banner for its
Page Title. Kills 2 birds so to speak
You visitors will also see the product
name in the address bar, and many search engines will list pages more accurately
if the page name is the same as the search parameters key words or phrases.
-
switch to page view
-
click on the " + " sign
next to the items folder located in your cart directory (to expand
the folder)
-
you will now have all your "it**.htm"
pages in view (or your newly renamed pages)
-
open your first .htm page in
page view
-
you will notice that the page title
is displayed in the top left cell, this is the page banner we discussed
earlier. Your product name is already on this page, so you'll never be confused
with what page you are working on.
-
by default, the sections of the product
detail page that you can customize are:
The left column:
-
Product image: place your large
image (300x300 pixels in this cell)
-
Manufactures logo: you can place
the mfg logo in this cell, with a link to their home page
-
Product links: place you links
to accessory items, software download, and manufactures support pages
The right column:
-
your view cart button has already been
updated
-
Add to Cart button: you will
need to copy the "Add to cart" button from your categories page, and replace the
default image
-
Product Description: add your
product description, the reason you have a product description on the categories
page and the product details is (1) you can create a more detailed description
on the product detail page, and (2) search engines will have a better chance of
indexing your web pages if you have more "phrases" and "words" related to the
keyword search.
-
Product Price: add a price for
this item, make sure it matches the price for the "Add to Cart" button
-
Usually Ships: you may wish
to remove the hyper link if you have not updated your shipping information page,
or you do not need one.
-
SKU Part No: if you have your
products listed with product numbers
-
Mfg. Part No: handy information
for your customers to know if they need to contact the manufacture
-
Overview: most manufactures
provide a product overview, you wish to contact your manufacture and ask about
using their product information on your web site. It's much easier to copy existing
"and updated" information.
-
Specifications: for products
that have specific details about setup, power consumption, or what ever information
a custom may need in order to influence their purchasing decision.
-
Product Registration: optional
links for your product
-
Warranty Information: optional
link to manufactures warranty info
-
Copyright: update with your
company name, the copyright info and links use a shared border throughout the
web site, updating one page will update the rest of the web pages.
-
you do not need to change the titles
or names of the pages located in the "zoom pages' folder
-
in order to keep the customer focused
on the category page, we added a "zoom" feature for cart.
-
how the zoom feature works is simple,
the customer clicks on the "zoom view" link next to the product
thumbnail, and a small (300x300pixel) window opens up displaying a larger image
of the product. Your customer can view a larger more detailed image, without ever
leaving the category window.
-
in order for the zoom window to display
the larger product image, we need to add the image to the zoom page, also
know as the target page. The zoom view link is a JavaScript feature, and not a
regular HTML hyperlink.
-
open your categories1 page (
or whatever you have renamed it)
-
your first product, which was formerly
named "it1" has a "zoom view" link which is connected to
a page in your "zoom pages" folder. Which is also located in the cart folder.
-
the corresponding page in your "zoom
pages" folder is aptly named "it1_zoom.htm", and you will notice the
corresponding link on the categories page, with the same name "it1zoom image"
located just beneath the "zoom view" link
-
we left this information, knowing that
once we changed the name of the product, it would make things a bit more difficult
to remember which page each product is linked to for the zoom image.
Adding the larger image to your zoom page
-
for the first item in your catalog,
open it's corresponding zoom page (this would be it1_zoom.htm, located
on the zoom pages folder)
-
find the image that you want to display
for this product (should be in your images folder, or you can drag an image from
an open web page it you have permission to do so)
-
delete the text that
is in the table, this is where you will placing your larger image
-
drag the larger image into the table,
if the image is larger than 300x300pixels, adjust the image size via the "Picture
Properties"
-
by placing your larger product image
onto the "it1_zoom.htm" page, it will be correctly displayed when your
customer clicks on the "zoom view" link
-
for your convenience, we have left
the "target page" information (it1zoom image) in the cell with the
"zoom view" link, you can delete this information once you have added
you image to the zoom page
That's it, as confusing as it gets, once
you have a hang of what to do, you can update a page in a minute or two. the same
time it would take to update a database.