Getting Started Index
If you have not yet created a new web, and you are
reading this on our example web,
please review the information on installing and creating a web.
Here is our menu of activities and frequently asked
questions. Please visit the support page
for further information about customizing your theme.
For information and
tutorials on using
Microsoft FrontPage 2000/2002, please visit our web site for
a detailed list of help topics.
Your theme
contains many additional graphics. Many of your pages already
contain theses elements, to remove them, simply click on them, and
press the delete key on your keyboard.
 |
 |
 |
|
 |
 |

contact us |

feedback |

search |
 |
 |
We
have added may additional JavaScript components to your web
template pages, with graphics that match your theme. To remove the
JavaScript from your web page, click on it, and press the delete
key on your keyboard.

add to favorites |

custom search button |

for product pages |
 |
 |
|
|
| |
|
|
|
You can replace the background images for the logo background or
page decorations with these images: here's how
- Right-click the table, and then click
Table Properties on the
shortcut menu.
- Under Background, select
the Use background picture
check box, and then click Browse.
- Select the background picture:
- Choose the name from the list of images below, Then click
Open.
- This will change the image from it's current background
picture, to the new one
option1
 |
option2
 |
option3
 |
option4
 |
option5
 |
option6
 |
option7
 |
|
|
To add a table header to your table or cell, and maintain the ability
to add text to it, follow these steps:
-
create a new table with at least two rows
-
the top row will be used for the table header,
the second row will be used for the content
-
in the top cell, right click, select cell properties,
and where you see the background image box, click on browse
-
find the file named "paragraph_header.gif"
in your images folder
-
select this file, and click OK until you
get back to the cell properties box
-
click on the style button located at the
bottom of the properties box, and select format
> font > from the font size drop down list choose a font
size of 8pt, or 10pt (8pt is the smallest font size
available)
-
click ok all the way out
-
this image will now be used as the background
image for the top cell, so you can add text over top of it. You
set the font size for the table so it will display correctly in
all browsers and text sizes.
The pages
included with your web site template:
| index.htm |
this is the first page your visitors will
see when they enter your web site. |
| home.htm |
This is the starting point for your web site,
all pages will be linked to your home page. |
| about_us.htm |
This is a generic page detailing your company
or business. |
| contact.htm |
This is where you contact information will
go. |
| feedback.htm |
This is a form page for gathering information
and feedback from your visitors. |
| getting_started.htm |
This page. |
| search.htm |
This is a form page used to search your local
web site. |
| services.htm |
This is a generic page detailing the services
your provide. |
| site_map.htm |
This is your table of contents, listing all
the pages in your web. |
| support.htm |
This is a generic support page, listing information
about your support methods and services. |
We've also included many template pages to help you start an on-line
business, these include:
| The following pages
are located in your cart folder |
| catalog.htm |
this is the starting place for your catalog,
displays the categories for your products. |
| categories1.htm / categories2.htm |
this page displays the items for each category. |
| policies.htm |
this is a generic policies page which you
can modify with your company information. |
| privacy.htm |
this is a generic privacy page, which you
can modify with your company information. |
| shipping.htm |
this is a shipping information page for your
customers. |
| product_detail.htm |
this is a blank product detail page. |
| it1.htm / it16.htm |
these are blank pages you can use to start
building your shopping cart. |
| it1_zoom.htm / it16_zoom.htm |
these are the zoom image template pages, used
in your shopping cart zoom image feature. |
| the following pages
are located in your cart_help folder |
| add_items.htm |
this is the pop-up page used in the
cart help index
. |
| adding_additional_pages.htm |
this is chapter of thecart
manual. |
| cart_help.htm |
this is the
cart help index
page used for the Cart Help pop-up window. |
| cart_setup.htm |
this is a chapter of the
cart manual. |
| how_it_works.htm |
this is a chapter of the
cart manual. |
| KIS-Cart_PayPal_template_manual.htm |
this is the
manual for setting up your shopping cart. |
| pay_for_items.htm |
this is a pop-up page used in the
cart help index
. |
| paypal_setup.htm |
this is a chapter of the
cart manual. |
| remove_items.htm |
this is a pop-up page used in the
cart help index
. |
| setup_preparations.htm |
this is a chapter of the
cart manual. |
| view_cart.htm |
this is a pop-up page used in the
cart help index
. |
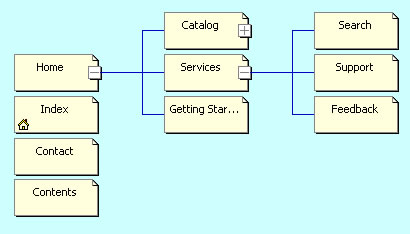
The navigation
structure of your web site:
This is the basic structure of your web site. The
first page your visitors will see is the index page, which is also
your Flash intro page. All other pages are "Top Level" pages, or
connected to your home page.
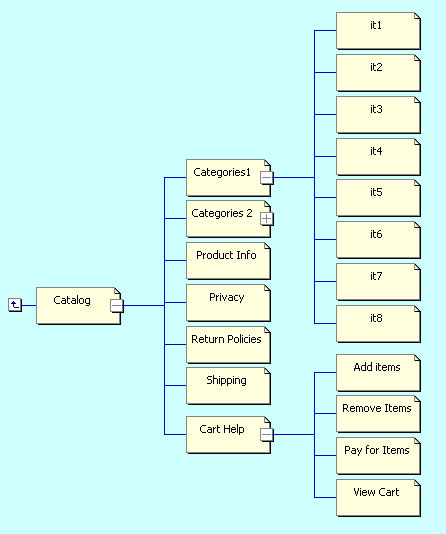
This is the navigational structure of your shopping
cart. All of these pages can be found in the "cart" folder of your
web site, and they are connected to the catalog page in that folder.
To create a new web page from the templates included:
- On the File menu, point to
New, and then click
Page or Web.
- In the New Page or Web
task pane, under New
from Template, click Page
Templates.
- Click the tab for the
template you want to use, and then click the template.
- you can choose a page template for your theme, which will
use the same name as your theme
- you can choose a page template for a product category page,
which uses your theme name_category
- you can choose a page template for a product detail page,
which uses your theme name_detail page
A
thumbnail of that template is displayed under
Preview.
- Click OK.
Microsoft FrontPage opens a new page based on the template.
To
copy an existing page, and create a new page.
If you gone to all the trouble of setting up a page just the
way you like it, and you want to create more pages just the same
do the following
- Save the page you are working on
- On the file menu, click on the Save as option
- In the highlighted box, change the name to the name you want
for your new page, or select a current page to overwrite it.
- Click OK
For information and tutorials on using Microsoft
FrontPage 2000/2002, please visit our web site for a detailed list
of help topics.
Frequently asked questions about theme packaging and installation
If you have already created a new web site, skip to our more
advanced tutorials at the bottom of the page. If you are viewing
this information from our example web site, then this is a great
place to start if it has been a while since you have create a web
using FrontPage, or if you have never created a web before.
- you will not see your web theme/template until you create
a new web (using the theme template). A common obstacle with
creating a web site using a FrontPage theme is that once the theme
is downloaded and installed correctly, the new theme can't be
found anywhere. FrontPage web sites are created, and you will
only see your new theme in action when you create a new web. (full
instructions on how to do this below)
- theme is the term used to describe the overall color
scheme, fonts, menu graphics, bullets, and tables of your web
site. It's also a great way to give your package a nice name.
- template is the term used to describe the structure
of your web site, ( how many and what type of pages), most FrontPage
Themes have a web page template packaged with it. You can easily
duplicate a page in your web, complete with all the graphics and
navigation, exactly like the home page.
- all of our themes are packaged in a self executable file.
By double clicking on the file, it will install all the necessary
files, into the correct locations.
Installation
- Once the theme has been downloaded, double click on the file
to start the installation process.
- You will not be asked which directories to place the files,
all the files will be added to the appropriate Microsoft shared
folders, and system directories. Your theme will be installed
to more than one directory, to be shared by the MS Office family
of programs.
- Your theme package is small enough to fit onto a blank 1.44mb
Floppy disk, please back up this file.
- your theme is now successfully installed into your system.
The installer program is set-up to recognize your operating system,
so the files will be installed correctly.
- now you will need to create a new web to see your theme in
action.
Creating a new web
- On the File menu, point to
New, and then click
Page or Web.
- In the New Page or Web
task pane, under New from
template, click Web
Site Templates.
- Click the web site template named for your theme
- In the
Specify the location of the new web box, type the
URL for the new web site, or click
Browse to create a new site on
your hard disk, network, or on the
Internet. the default location is c:\my documents\my webs
- remember the location of this installation, the next time
you start FrontPage, you may be required to located this web on
your hard drive if you haven't set "open last web automatically"
in your FrontPage options.
Note To create
a
subweb, append the name of the subweb to the name of the
root web. For example: http://adventure-works.com/subweb.
- Choose one of the following:
- If you want to add the site to the current web site, select
Add to current Web.
- If you are creating a Microsoft FrontPage web on a secure
port of a Web server that supports
Secure Sockets Layer (SSL), select the
Secure connection
required (SSL)
- Your new web site will start to generate. This may take up
to a minute depending on your PC setup, fragmentation of your
hard drive, and the file size of the web template.
Once you've installed your theme, you may wish to preview the help
topics.
|
message box 1
|
message
box |
| Add you own text or images to the message
box. The properties are already set for this table, so
you can easily copy this box to add more to you page,
or add it to another page. The text size for this table
is set to 8pt, which is the smallest font size that can
be used. The message box table is set to 150 pixels wide.
It will stretch as far as needed. |
|
| |
|